
Chiropractor Chandler AZ
Knee Exercises
Each is exercise has a link to its own page with more pictures, videos, and a more indepth exercise description.
Basic exercises start with increasing pain free range of motion. If it hurts, STOP. This is not the stage where we push through pain to perform the exercises. Once again, this is not the "No Pain, No Gain" stage.
From seated positions we move to standing. We always want to master the simpler exercise before progressing to harder exercises. Challenging the body's proprioception (balance) system increases your neurologic learning and accelerates your recovery. The exercises always start with your eyes open. When you feel fairly steady, close one eye. This causes a loss of depth perception. Closing both eyes is significantly harder. Always perform eyes closed exercises in a safe environment when you can grab onto something for support, such as a wall or cane.
Pain Free Range of Motion Exercises
Knee flexion and extension
Start with the knee bent and hanging off a chair, table or bench. Slowly extend the knee. Pause at full extension and flex the knee as far as comfortably possible. The exercise can be made more difficult by adding an ankle weight or resistance rubber band.


Seated hip abduction and adduction
Abduction is taking your upper leg to the side, and adduction brings the leg back to the middle. Initially the exercises can be performed in a chair, but you should quickly advance to a lying or standing position. Once again, the exercises can be made more difficult by adding a resistance band.
Seated hip Internal and external rotationInternal hip rotation is when the femur and knee turns inward, and external rotation is the opposite motion. In a seated position with your knees bent at a 90 degree angle, place your right foot on the ground and lift the right ankle across the left. Try to keep the femur in the same position while pivoting the ankle. Repeat this motion 10 times, then the opposite motion. By anchoring the rubber resistance band to the bottom of the chair and ankle, the band will apply resistance throughout the motions.


Beginning Knee Exercises
Standing on two feet together
Move the feet closer together with the knees slightly bent. Start with trying to maintain balance and limit the amount of sway.
Standing tandemImagine you are standing steady on a tightrope. One foot should be directly in front of the other with the knees bent.

Single leg stance
Stand on one foot and stay steady. Your eyes and head should be facing forward with the shoulders and waist aligned. The knee should be pointing straight forward and not rocking inward. Your body weight should be distributed across the middle of your standing foot, while the foot arch is maintained and not flattening inward.
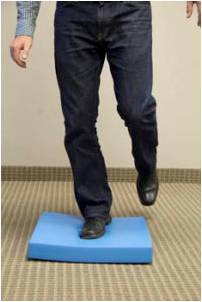
To make the exercises even harder, you can add slow squats or weights to the exercises. The exercises can also performed on increasing unstable surfaces, such as a folded up towel, foam, BOSU ball, rocker board, wobble board or vibration plate.
All of the exercises start on the ground and then progress to a more unstable surface.
Calf raises
Standing with two feet shoulder width apart, slowly raise your heels off the ground as you keep your balance. Then slowly lower your heels back to the ground. Initially start with two feet, then progress to single leg when your strength improves.


Single leg posterior hip bumps
Stand six inches from a wall on your right leg, with your left held in front. Slowly move backward until you fall into the wall, and then push yourself off the wall with your hips. Once you regain a steady balance on one foot, repeat the exercise. As you improve, move further from the wall.


Side hip bumps
Similar to the posterior hip bumps. Standing with your hip facing the wall, fall to the side. Push off the wall with your hips and then regain your balance. You will need to start closer to the wall compared to posterior hip bump exercise. Hip bump exercises can be made more difficult by standing on an unstable surface or with your eyes closed.


45, 90, 180
Laying flat on your stomach, raise your leg while keeping the knee straight. The movement should come from extending your hip and not rolling your pelvis. Perform 10 repetitions with the right leg before 10 repetitions with the left. Next, keeping the knee straight and toes pointed toward the floor, move the foot to the side abducting the hip. You will feel more muscle activation on the side of your glutes. Once again, perform all 10 repetitions before switching legs.
The last part of this exercise is to lift your foot at a 45 degree angle in a linear line. This is the hardest of the 3 for most people. Only go as far as you can without straining or rotating your femur. Build up to 3 sets of 10 on each leg. To make the exercise harder, go through the movements with a resistance rubber band.
Side steps foamStart by standing on your right leg with the left held slightly above the ground. Step to the left and have your weight shift to the left leg. Then lean back to the right and raise your left foot off the ground. Once you are steady on your right leg, repeat the exercise 10 times per side.
Single leg hip abduction
Standing on one foot, abduct the raised leg to the side. Concentrate on slow and steady leg abduction movements while maintaining balance. A rubber band can be added around the legs to make it more difficult.


Step ups
Start with a three-inch aerobics step. Stand behind the step and practice stepping forward and up the step while keeping your knee pointing forward and trying not to shift your body weight to the side, compensating for weakness. Over time and improvement, you can increase the height of the step. The length of your stride can also be increased for added difficulty.


Backward step ups
Next we practice going up the step backwards. Also stepping from the step and onto the ground backwards. Going slow is much harder than going fast. Slow movements require you to use more hip stabilizers than when you would to go fast. So go slow.
Side step upsJust like it sounds. Laterally go sideways up the step. Focus on keeping your waist as level as possible and controlling your torso rock. Step both up and down the steps each direction.

Square dance
Stand on your right leg with the left held slightly in the air. Keeping all your weight on the right foot, reach the left behind you and tap the ground without supporting any body weight. Then reach the leg forward and tap a point in front of your right leg. Next reach back and to the left, tapping the ground, then reach forward and to the left. Think of tapping the corners of a square. Repeat 10 times on each leg.
Once you have become comfortable with the square dance exercise, begin crossing behind and in front of your body. When standing on your right leg, your left foot will tap a point behind and to the right of your body. Likewise, when standing on your left leg, tap a point in front and to the left of your body.
These exercises are challenging your knee and hip balance while increasing stabilization strength and endurance.


Ball Wall Squats
Next we can add wall squats with an exercise ball. Place the exercise ball behind your waist with and slightly lean into the wall. Your feet should be two feet apart. Keep your back straight as you squat downward. Squats can be performed with two feet apart and toes forward, or toes at a 45 degree angle.


Single Leg Ball Wall Squats
Next perform single leg squats. Once again, try and move slowly and controlled through the exercise while pausing at the bottom of the squat. Another form of the exercise is to squat and hold the position for 30 seconds before standing.
Split squats
Take a large forward step and keep your legs apart. Keeping your back straight, lower your waist toward the ground. Stop as it becomes too difficult to keep the back straight or maintain balance. Your knees should continue to point forward, and your waist should not rotate or wobble.
These squats are used as a transition to build strength and endurance toward a forward and backward lunge. For added difficulty, place a piece of foam or towel under one leg to make it more unstable.
Forward LungesTake a larger step forward while maintaining an upperward posture. Lower your waist toward the ground like the split squat. Placing more weight on the front foot and leg, step forward using more of your glute muscles for hip extension. Then step forward with the other leg and repeat the exercise.
At first, do not lower your waist all the way to the ground. Perform the exercise in a stable and controlled manner. With increased leg and hip strength you will be able to go lower and perform more repetitions.
Slow Walk ResistanceWith a mild resistance rubber band around your ankles, begin walking in a straight line. Do not move fast. Focus on slow, controlled movements and maintain resistance for most of the exercise. The walk can be exaggerated with a swinging leg to the side, or a monster-type walk.
Duck WalksSide to side walks are used to increase lateral hip, knee and ankle strength. Place a resistance band around your ankles and keep tension on the band throughout the exercise. Initially, move slowly stepping with the lead leg to the side and even more slowly as you bring the trail leg back toward the middle. Don't lose tension on the band as the trail leg nears the lead leg. There are three positions for duck walk:
- Toes pointing straight forward the entire time.
- Toes pointing inward the entire time.
- Toes point out the entire time.


Single Leg Squats
Standing on one leg with the other knee bent, keep your back straight as you squat downward, until the point where you want to hinge forward. Over time, you will be able to squat lower and lower before wanting to hinge. Start squatting on the ground, then add unstable surfaces after improving.
Clock ExerciseThink of the face of a watch, not a digital clock. Standing on one foot with the raised foot held behind you, rotate as far as you can counter clockwise. Keeping your hands at your chest and your back straight, squat down as far as you can maintaining form and balance. Like the hands of a clock, you are probably at the 8 or 9 position.
Slowly rotate clockwise one position and squat again. Work through all the positions of a clock dial that you can, and then repeat going clockwise.
Bridging ExercisesStart laying on your back with knees bent and feet shoulder width apart. Slowly raise your waist toward the ceiling, trying to pick your pelvis up toward the ceiling but not extending your back. The idea is create a straight line from your shoulder through the waist and to the knees. Concentrate on slow and steady movements up and down, keeping the waist level at all times. Avoid swaying or tipping the pelvis during the movements.
Bridging exercises start with two feet apart and then move to two feet together. Then move to a position with one foot on top of the other and next, on one leg with the lifted knee bent. Finally, the lifted knee is kept straight. The progression is mastering 3 sets of 10 with two feet apart before moving onto two feet together. Then progress to one foot on top of the other for 3 sets of 10 before moving onto single leg position.
Eventually this same progression is performed with an exercise ball under your shoulders. The ball makes you unstable and requires more core stabilization and strength. Eyes can be open or closed for increased difficulty.
Hamstring Ball CurlLaying on your back with two feet on an exercise ball, lift your waist into the air. Next, pull your feet into the ball and roll it toward your waist. The harder you pull into the ball the more stress will be applied to the hamstring muscles. After you pull the ball as far as you can, extend your legs as you maintain pressure into the ball. The exercise can be performed with two feet or a single leg.


Plank Exercises
Planks are a tremendous exercise for increasing rectus abdominis and oblique muscle strength, which is commonly lost in people with chronic knee pain. Plank exercises can be modified to being on your knees instead of feet, which makes the exercise significantly easier. Start where you can and then progress as you are able. People with back pain and weakness increase strain on their knees. Getting the core stronger will reduce some of your knee pain.
Anterior PlankLay on your stomach with your forearms underneath your chest. With your tip toes firmly on the ground, lift your waist and body off the ground. Keep your back straight as you create a straight line from your shoulders through the waist, knees and to the ankles. The tendency is to drop the pelvis or lift the butt in the air as you get tired. Hold the position to fatigue at first, then build up to three sets of 2 minutes.
Anterior plank exercises can be performed on your forearms or hands with elbows straight, like the top of a pushup position. Moving the hands closer together makes the exercise harder, as does moving the feet closer together. Eventually you can perform a plank on one foot or hand. You can also place an exercise ball or BOSU ball under your hands or toes for added difficulty.
Video: Anterior Plank - 3 Positions
Lateral Planks
Start by laying on your right side with forearm perpendicular to your torso. Lift your waist of the ground while keeping the side of your right foot on the ground. Your left foot will be on top of the right. Focus on keeping your body perpendicular to the ground, and not rocking forward or bending at the waist.
Start by holding the position to fatigue and then switching to the left side. Build up to three sets of 1 minute on each side.
Once again, the exercise can be made more difficult by placing an unstable surface under the hands or feet. Likewise, a weight can be added to the free hand.
Intermediate Exercises
Many of the beginner exercises can be made more difficult by changing the surface, especially as it becomes more unstable. You can also hold a 5-10 pound weight during the exercises to further challenge the stabilizer muscles.
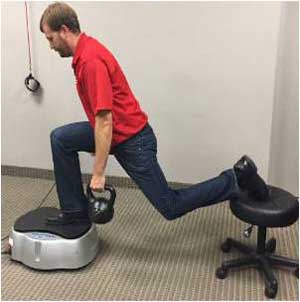
Vibration platforms make any of the standing exercises harder by knocking you continually off balance. The body has to work harder to maintain balance along with moving through the activity. At our office, we slowly incorporate most standing and squatting exercises onto the vibration plate. Most people are surprised how much harder the exercises become on the plate.
Steps ups and DownsEarly on we practiced stepping up on and down from a step or boxes. Increase the height of a box or make it a small jump. One of my favorites is to step as slowly as possible off the vibration platform, really focusing on trying not to touch the ground until it is absolutely necessary. Likewise, you can practice stepping up on the vibration unit backwards, trying to go as slowly as possible off the ground.
BOSU & Vibration Single Leg StancePerform single leg stance exercises on the vibration plate. Maintaining balance on one leg while squatting is significantly harder on unstable surfaces. Start with standing on the rubber portion of the BOSU before turning it upside down. Then transition to squatting on the vibration plate.


Square Dance Vibration Unit
Instead of just reaching forward, backward and to the side, this time you will reach as far as you can in all directions and squat at the same time. Squatting further challenges the hip and knee stabilizers, and the vibration plate magnifies the difficulty. This exercise will really expose your hip and knee stability weakness.
Rotational Movements on BOSU or VibrationStanding with either two feet or one foot, squat downward while maintaining an erect posture. No hinging at the low back. With your hands in front of you, rotate to one side and then the other side. Once you get the hang of it, add a weight to your hands. The further you can hold the weight from your body, the harder the exercise becomes, especially on one foot.


Square Jumps
Visualize a box six inches by six inches on the ground. With two feet together, jump from corner to corner. Start going clockwise and then switch to a counter clockwise direction. If you are stable and under control, begin jumping diagonally across the box. Over time the box can get bigger and bigger. Transition from two-foot jumps to single leg.


Dot Drill
The dot drill begins the dynamic movements and plyometrics exercises. Placing five dots on the ground, similar the the patterns on dice, jump from dot to dot. Practice all directions with two feet and then progressing to one foot.

Skier Jumps
Standing on your right leg, jump laterally to your left and land on your left leg only. After establishing your balance, laterally jump to the right. Start jumping slowly and establish your balance before jumping the other direction. With improvement, jump further and faster.


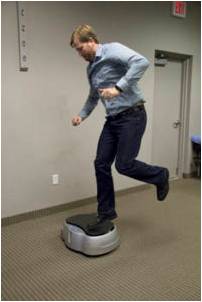
Single Leg Jumps onto Vibration Plate
Standing on your right leg, jump forward onto the vibration plate. Land and regain your balance before jumping forward off the vibration plate and then quickly jumping forward again. After improving on the forward jumps, stand on the right side of the plate on jump laterally to your left, landing on the plate. Once again, regain full control before jumping laterally off the plate and onto the ground, quickly jumping to the left upon impact. Repeat the exercise jumping to the right. Once comfortable, you can attempt jumping backwards onto the plate and off.


Additional Intermediate and Advanced Exercises can be found at the Exercises Page