
Chiropractor Chandler AZ
Simple Home Exercises & Stretches To Improve Your Swing and Stay Pain Free.
The pros make it look easy with a smooth swing and straight flying ball. Most so-called "golf hackers" swing the golf club like an ax, and awkwardly accelerate through the torso. Higher handicap golfers slow their upper body movements at impact instead of accelerating through the ball.

A 2018 study by K. Steele PhD, entitled "Golf Swing Rotational Velocity: The Essential Follow Through," (Annals of Rehabilitation Medicine) evaluated pelvis and torso rotation velocities during a golf swing. It compared techniques used by amateurs and professionals. Professionals were very consistent and similar to each other in torso and pelvis velocities. Amateurs were more erratic, while low handicap amateurs were more similar to pros.
Professionals generate more rotational velocities than amateurs, and are more consistent with their swings. Lower handicap golfers have pelvic rotation velocity similar to professionals; while high handicap golfers have the slowest. In follow-through, pelvic rotation is not much different between between pros and amateurs. Peak velocity occurs immediately prior to impact in professionals.
One of the most interesting findings was that upper torso angular velocity is maintained through follow through in professionals, but quickly drops off in amateurs after striking the ball. According to Dr. Steele, "These findings suggest that upper torso rotation during the follow-through phase of the golf swing likely contributes to power generation and to a smooth swing pattern that may prevent injury, and thus may warrant specific training strategies. " In addition, "modultation of upper torso rotational velocity during the entire golf swing may be an important factor to consider to achieve a smooth swing pattern, both for performance as well as injury prevention in amateur golfers." https://www.ncbi.nlm.nih.gov/pmc/articles/PMC6246863/pdf/arm-2018-42-5-713.pdf
Producing And Absorbing Force
I heard a professional baseball trainer describe baseball "as producing and absorbing forces, in both swinging and throwing." Players need to continually produce and absorb the force in their repetitive motions. Golf is very similar.
As with baseball, golfers only swing in one direction. The golfer produces elastic energy by rotating into a backswing, and then accelerating through the ball with well timed lower and upper body movements. The club head should accelerate through ball impact, and the golfer must absorb the kinetic energy without causing injuries.
Golf requires flexibility, strength, endurance, and coordination. White it can be played with functional limitation, those limitations can lead to excessive stress and chronic repetitive injuries.
Achieving faster club head velocity and preventing injuries requires more than traditional weight training exercises. Actually, most machine work will not transfer to the golf course. To become a better golfer you need to develop the right type of strength in the right places.
Furthermore, improved muscular endurance will keep the swing mechanics and timing consistent longer before fatigue sets in. Once your body gets tired, the timing of the torso and pelvis becomes erratic along with ball control. Many people fatigue on the back nine, which is why they start to push and pull shots, and not hit as cleanly as on the front nine.
Studies comparing professionals and amateurs golfers list the following as causes of swing dysfunction:
- Decreased trunk and pelvis flexibility
- Weakness in hip abduction
- Poor core spinal muscle stabilization
- Weakness in pelvic strength and stabilization
- Poor transfer of energy from pelvis to torso
- Reduced ability to absorb force during follow through
My primary goal is to reduce your injury risk, so you can golf more often with less pain. Improved performance will motivate you to continue with the exercises.
Flexibility
Hip and torso flexibility are equally important. If the hips cannot rotate, much of the pelvic elastic and kinetic energy is lost. Additionally, many golfers tend to sway instead of coil. Hip flexibility plays a role not only in producing swing forces, but also in absorbing forces to reduce lower back strain.

Torso flexibility allows for the coil motion in the back swing, and supports the follow-through. Limitation in torso flexibility creates a chopping or altered club head path.
Picture your golfing friend with poor flexibility: the backswing is more of a sway and elliptical motion instead of a powerful coil.
The stretches we recommend are the calf, quadricep, piriformis series, lunge, and torso twists. These exercises should be comfortable, and not cause pain. Consistently stretching over months is the key to gaining flexibility. Stretching a couple times a week is not going to produce the improvement you are looking for.
Hip Abduction Strength
Hip abduction refers to the muscles that lift the leg to the side and stabilize pelvic and back movements. Hip abduction weakness is a common problem since daily movement is primarily forwards and backwards, as opposed to side-to-side. Weak hip abductors are a leading cause of lower back pain. When the hip abductors fail to stabilize the pelvis excessive strain is placed on the lower back during standing and walking. Weak hip abductors lead to increased lumbar and hamstring muscle spasms, reducing flexibility and function.
Eventually it becomes more difficult to squat on two feet or stand on one leg, both of which require hip strength and stability. A test for athletic power and explosion is the "Y test," which involves squatting on one leg and reaching in three different directions. The better people can perform this test the more explosive power they possess, and the less risk of developing a lower back or leg injury.
From a golfing perspective, inability to stand on one foot means that the hip abductors are not stabilizing the pelvis during the swing, or effectively transferring power through the golf swing. Weak hip abductors lead to compensatory movements and increased torsion on the spinal joints. Improving this single muscle group will improve the golf swing and reduce daily lower back pain.
An easy test and measure of improvement is the ability to stand on one foot without losing balance. This requires strength and stability throughout the pelvis and lower extremities. A second test would be performing the 45, 90, 180 exercise shown in the exercises section. Weakness in the lateral movements is evident by limited range of motion and strain during the exercise.
Poor Core Muscle Strength & Coordination
It is not the size of the driver but how you use it. How well the core muscles work together determines swing efficiency, power, and injury risks. Professionals have core muscles that contract properly and efficiently, which is why their swing is consistent, effective, and smooth.

Another example I like to use is juggling. You may have the strength to juggle three golf balls, but do you have the coordination to keep it going? Core muscles stabilize the spine and create rotational power by a well-coordinated series of contractions, and corresponding relaxing muscles. Most people lose these muscle patterns due to age and injury. The body figures out a way to rotate through a swing, but it is not efficient or effective.
I know you have seen this phenomenon on the golf course: the 90-year old with an easy and smooth swing driving the ball to the middle of the fairway, past many younger people who swing much harder. The 90 year old does not have the strength of younger golfers, but precise muscle contractions are enabling the club head to accelerate at the correct time. The 90 year old has excellent core coordination that stabilizes the spine while allowing hips and torso to rotate.
Fortunately core muscle coordination is easy to improve using the series of stability exercises below. The exercises strengthen the muscles, and improve their ability to work together. These drills are likely different than many of the gym exercises you have seen, but they add tremendous value to a golf swing and injury prevention.
Improving Ability to Transfer and Absorb Energy
The exercises that teach the body how to stabilize and contract muscles slowly increase in difficulty. These exercises build off core stability and are more sport specific. As the core stabilizers improve, the addition of progressively dynamic exercises will produce the results you have been working towards.
Many people want to skip steps and just work on these exercises, but it's important to start with the basics. An analogy would be taking a brand new golfer out on the course instead of to the practice range first, leading to frustration and minimal improvement.
Progressing through these exercises will enhance your golf game, eliminate back pain, and keep you golfing for many more years. At the end of the exercises is a suggested workout routine to get started.

Basic Flexibility Exercises
Knee Side To Side
Perform the knee side-to-side exercises in a slow and controlled manner. Start on your back with your knees bent. Very slowly rock them to your left, stopping before experiencing any pain or spasms. Slowly rock back to a neutral position and toward the right, once again stopping if you experience any lower back pain. Slowly rock your knees back and forth 15 to 20 times.


Knee To Chest
Laying on your back with knees bent, grab your right knee with both hands and pull it toward the chest. You should feel a comfortable stretch and hold for 20 seconds and then release the stretch for a few seconds and then stretch toward the chest again. Repeat with the other leg. If those go well, pull both knees to the chest for a comfortable stretch. For a greater stretch, pull one knee to the chest and straighten the other leg.


Video: Review of Knee Side to Side and Knee to Chest
Piriformis Hip Stretch
Another exercise you can perform while lying on your back is to pull your left knee toward your chin. You should experience a light, comfortable stretch in your lower back and hip muscles. Stop if it hurts. After holding for a few seconds, slowly pull your left knee toward your right shoulder. Then pull toward your right elbow. Each position will stretch a different part of the hip. Repeat the raising and lowering of the left knee 10 times. This exercise can then be repeated on the right side. For increasing stretch pull on the ankle and rotate the leg.
Video: Hip Stretching to Decrease Back Pain
Forward lunges
Start with your arms at your sides. If you feel unsteady, do this exercise near a wall, table or sturdy chair to hold onto. Lunge forward with one leg. As with squats, it is not necessary to do a full, deep lunge to benefit from this exercise. Move the forward leg back to the starting position and lunge forward with the opposite leg. Start with one set of 10 and work your way up to two sets.
At first, do not lower your waist all the way to the ground. Perform the exercise in a stable and controlled manner. With increased leg and hip strength you will be able to go lower and perform more repetitions.
Balance and Stability Exercises

Standing on two feet together
Move the feet closer together with the knees slightly bent. Start with trying to maintain balance and limit the amount of sway.
Standing tandem
Imagine you are standing steady on a tightrope. One foot should be directly in front of the other with the knees bent.
Single leg posterior hip bumps
Stand six inches from a wall on your right leg, with your left held in front. Slowly move backward until you fall into the wall, and then push yourself off the wall with your hips. Once you regain a steady balance on one foot, repeat the exercise. As you improve, move further from the wall.
Side hip bumps
Similar to the posterior hip bumps. Standing with your hip facing the wall, fall to the side. Push off the wall with your hips and regain your balance. You will need to start closer to the wall compared to posterior hip bump exercise. Hip bump exercises can be made more difficult by standing on an unstable surface or with your eyes closed.
Door frame touch
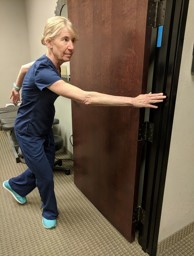
This exercise works to strengthen your knees and pelvic stabilizers. Stand in the middle of a doorway frame, about a foot behind the frame itself. This is a single-leg stance exercise, and the knee of the standing leg should be slightly bent. Slowly twist to the left and touch the frame with your right hand; then slowly turn to the right and touch the frame with your left hand. Make sure that you are twisting your whole body when you touch each side of the door frame, not simply reaching for it. Touch each side of the door frame ten times for one complete set.
Bridging exercises
Start on your back with knees bent and feet shoulder width apart. Slowly raise your waist toward the ceiling, trying to pick your pelvis up toward the ceiling but not extending your back. The idea is to create a straight line from your shoulder through the waist and to the knees. Concentrate on slow and steady movements up and down, keeping the waist level at all times. Avoid swaying or tipping the pelvis during the movement.


Bridging exercises start with two feet apart and then move to two feet together. Then move to a position with one foot on top of the other and next, on one leg with the lifted knee bent. Finally, the lifted knee is kept straight. The progression is mastering 3 sets of 10 with two feet apart before moving on to two feet together. Then progress to one foot on top of the other for 3 sets of 10 before moving onto single-leg position.
Glute ball bridge:
The glute bridge builds strength in all of the gluteal muscles: Maximus, Minimus and Medius. The ball makes you unstable and requires more core stabilization and strength. Eyes can be open or closed for increased difficulty.


Roll out on the ball until it is resting under your shoulders, supporting your upper back. As with the plank position, having your feet shoulder width apart makes the exercise easier, whereas keeping the feet and knees together is more challenging. Cross your arms across the chest. Slowly lower your hips to the floor and then raise them back up to a tabletop position. Watch out for any side-to-side movement (usually indicating pelvic instability from weak hip stabilizers). Also, be careful not arch your back, since this can cause lower back strain. Repeat ten times for two-to-three sets.
Esther's clamshell:
Our physical therapist, Esther Kim, showed us this neat and very challenging variation on the clamshell exercise. Start by lying on your side, with one hand in front to support your trunk and the other supporting your head. Raise your hips off the floor with knees bent, knees and feet together. Keeping the feet together, slowly open and close the knees in a clamshell motion. Repeat ten times on each side for a set.


Crunch and Side Crunch
Start by laying on your back with knees bent. With your hands resting on your quadriceps crunch forward with your stomach and reach the hands toward the knees. The chest should only move a few inches forward with the back safely resting on the bench.


Side crunch starts with your right hand resting on the bench by your right hip. Contract the side torso (oblique muscles) and reach further toward your foot. The shoulder should only move a few inches as you feel the contraction on your side. Repeat on the left side.
Bird dog:

Start out in the quadruped position on the mat, with both hands and knees on the floor. Slowly extend the right arm straight forward and left leg straight back. Your arm, torso and leg should form a straight line. Bring the arm and leg back down to the floor and reverse. Ten arm and leg lifts on each side constitute one set.
45, 90, 180
Laying flat on your stomach, raise your leg while keeping the knee straight. The movement should come from extending hip and not rolling your pelvis. Perform 10 repetitions with the right leg before 10 repetitions with the left. Next, keeping the knee straight and toes pointed toward the floor, move the foot to the side abducting the hip. You will feel more muscle activation on the side of your glutes. Once again, perform all 10 repetitions before switching legs.
The last part of this exercise is to lift your foot at a 45 degree angle in a linear line. This is the hardest of the three for most people. Only go as far as you can without straining or rotating your femur. Build up to 3 sets of 10 on each leg. To make the exercise harder, go through the movements with a resistance rubber band.
The exercise can also be performed standing or with resistance bands for added difficulty.
Medicine ball woodchopper:
Begin standing with feet shoulder width apart, holding the medicine ball straight out in front of you. Reach up and to the right with your arms extended, then bring the ball down and to the left, bending your knees for a full range-of-motion. Your back should remain straight and flexed slightly forward. Keeping the arms straight, bring the ball up on the left-hand side and fully extend your arms, now swing it down and to the right, bending the knees as you go. Ten "chops" in each direction is one set.


Lunge with medicine ball twist:
Stand with your feet slightly apart, holding the medicine ball in front of you. Lunge forward with the left leg, while swinging the medicine ball to the right. Return to the standing position while moving the ball back to midline. Repeat for a total of ten lunges and twists on each side.


Modified plank

You can do a modified plank exercise off the side of your bed or a sturdy table. Position your arms on the table or bed so that they are directly below your shoulders. You may want to grasp your hands together to be more stable. Now move your feet straight out behind you. Imagine a straight line that connects your head, shoulders, hips and feet. That is the perfect plank. Start by holding this position for 10-15 seconds and work your way up to sixty seconds.

Modified push-up
The difference between a modified push up and a full military push up is that you pivot from your knees as opposed to your feet. You can also do full push ups off of a wall, or an incline push up off of a bench using the modified position.
Plank From Knees
Planks are a tremendous exercise for increasing rectus abdominis and oblique muscle strength, which is commonly lost in people with chronic knee pain. Plank exercises can be modified by starting on your knees instead of feet, which makes the exercise significantly easier. Start where you can and then progress as you are able. With improvement the exercises can be performed from your feet instead of knees.
Anterior Plank
Lay on your stomach with your forearms underneath your chest. With your tip toes firmly on the ground, lift your waist and body off the ground. Keep your back straight as you create a straight line from your shoulders through the waist, knees and to the ankles. The tendency is to drop the pelvis or lift the butt in the air as you get tired. Hold the position to fatigue at first, then build up to 3 sets of 2 minutes.
Anterior plank exercises can be performed on your forearms or hands with elbows straight, like the top of a push up position. Moving the hands closer together makes the exercise harder, as does moving the feet closer together.
Lateral planks
Start by laying on your right side with forearm perpendicular to your torso. Lift your waist of the ground while keeping the side of your right foot on the ground. Your left foot will be on top of the right. Focus on keeping your body perpendicular to the ground, and not rocking forward or bending at the waist.
Start by holding the position to fatigue and then switching to the left side. Build up to three sets of 1 minute on each side.
Once again, the exercise can be made more difficult by placing an unstable surface under the hands or feet. Or add a weight to the free hand.
Plank on the ball:

For beginners, start with your feet slightly apart and the ball under your chest. Your head, shoulders, back, hips and legs should ideally form a straight line. Raising your hips too high makes the plank easier but less effective, while letting them fall towards the ground can cause lower back pain.
Once you have mastered this position, progress by positioning your forearms on the ball with the elbows slightly apart and hands together. To make the position more difficult, bring your feet together. Then try lifting one leg off the ground.
Russian twist:
Start in a supine position (lying on your back) with your knees bent and feet on the floor. Grab the medicine ball between your hands and lift your feet off the floor. Curl up and twist to one side, then come back to neutral and twist to the other side. Twisting to each side ten times is a set.


Medicine ball pull-over:
Roll the ball out so you are supine with the exercise ball supporting your upper back. Hold the medicine ball between your hands and extend your arms straight up so the ball is above your chest. Keeping the arms straight, extend the ball so it is slightly in back of your head. Then move the ball back to the starting position keeping the arms straight. Repeat nine more times for a set.


Medicine ball "skull crusher":
Do this exercise with a spotter, since it involves lowering the medicine ball over your head. Roll out on the exercise ball supine until it is supporting your upper back. Holding the medicine ball between your hands, extend your arms so the ball is straight above your chest. Now bend your elbows and lower the ball towards your forehead. Straighten your arms until the ball is back at the starting position above your chest. Repeat nine more times for a set.


Seated leg-raise:
Sit on the ball with your arms crossed. Slowly raise the left leg, lower it and then raise the right leg. Repeat ten times with each leg for a set. Eventually you can add a weight to hold in front of you or to the side for added difficulty.


Seated Ball Twists:
Sitting on the ball with feet shoulder width apart slowly rotate the torso to the left. Pause for a few seconds and then rotate toward the right, pausing at the end range of motion. These exercises can be made more difficult by moving your feet closer together or holding a weight in your hands. Eventually the weight can be held in front of the torso during the movements.
Seated Ball Chop:
A variation of the medicine ball woodchopper exercise, sitting on the ball with hands in front. Reach up and to the right with arms extended, and then reach down to the left. A medicine ball or small weight can be used for added difficulty. Perform this exercises both directions.

Abdominal curl-up:
The ball should be positioned to support your lower and middle back. With your arms positioned so that your hands are supporting your head and neck, tighten abdominal muscles and curl up slowly. Return to the original (supine) position. To add challenge, twist while curling, first to the left and then to the right.
Lateral curl up:

Start with your feet on the floor, lying on your side with the ball under your hips. You may want to prop one of your feet against a wall to anchor yourself. Curl up sideways, then lower back down to the starting position. Repeat for a total of ten lifts on each side.
Cross Crawl Ball:
Start in a prone position with your hands and feet touching the floor and the ball under your trunk. Slowly lift the left arm and right leg off the floor and extend them so the they are aligned with the body (straight out to the front and back). Lower them back to the starting position and lift the opposite limbs. A set consists of ten lifts on each side.

Mountain climber:
You will have learned about the glute bridge in the basics section.


The mountain climber on an exercise ball is a variation on the ball plank. Once in the plank position, kick one knee towards the ball, then move it back to the plank position and kick the other knee forward. You should move your legs quickly, similar to running up a hill.
Exercise Progression
Exercises should be performed for 4-6 weeks depending on your progress. Stay at the level until the exercises feel easy and are not challenging, then move up to the next level.
Level 1
Basic flexibility exercises every day including knee side to side (30 repetitions), knee to chest 20 reps, piriformis (3 sets), and forward lunge stretch (10 each side).
On odd days: 2 minutes of tandem stance, 20 side hip bumps, and 20 single leg posterior hip bumps. If single leg hip bumps are too difficult change to tandem feet position.
On even days: Glute Bridges two feet apart (3 sets of 10), crunch 20, side crunch (10), bird dog (3 sets of 10), and 45, 90, 180 (3 sets of 5). When bridging with two feet apart becomes easier switch to two feet together bridging. Slowly increase the repetitions for 45, 90, and 180 with improvement.
Level 2
On odd days bridging on single leg modified ( 3 sets of 10), door frame touch (30 reps), Esther's clam shell (3 sets of 10), medicine ball woodchopper ( 3 sets of 10 each side), lunge with medicine ball twist (3 sets of 10), and single leg stance (2 minutes each leg).
On even days modified plank ( 3 sets to fatigue), ball glute bridge 2 feet apart ( 3 sets of 10), seated ball leg raise (3 sets of 10), abdominal ball crunch (3 sets of 10), and cross crawl ball (3 sets of 10).
Level 3
on odd days: glute bridge ball two feet together (3 sets of 10), medicine ball skull crusher (3 sets of 10), lateral curl up (3 sets of 10), seated ball twists (3 sets of 10), and seated ball chop (3 sets of 10).
On even days: anterior and lateral planks from knees ( 3 sets to fatigue each position), modified push up 3 sets of 10), mountain climber bench (3 sets of 10), two foot together or single leg modified glute bridge from bench ( 3 sets of 10).
Level 4
on odd days single leg modified ball bridge (3 sets of 10), seated ball chop (3 sets of 20), seated ball twists (3 sets of 20), russian twists (4 sets of 5), medicine ball skull crusher ( 3 sets of 10).
On even days anterior and lateral planks from feet ( 3 sets to fatigue each position), modified push up 3 sets of 10), mountain climber ball (3 sets of 10), lunge with medicine ball twist (3 sets of 10), single leg or modified glute bridge from bench ( 3 sets of 10).
Level 5
on odd days single leg ball bridge (3 sets of 10), seated ball chop (3 sets of 20), single leg seated ball twists (3 sets of 10), russian twists feet together (3 sets of 10), and cross crawl ball (3 sets of 10).
On even days exercise ball anterior planks from feet ( 3 sets to fatigue), lateral ball planks 3 sets to fatigue (lateral curl up if too difficult), mountain climber ball (3 sets of 10), lunge with medicine ball twist (3 sets of 10), and single leg door frame touch with two lbs weight (3 sets of 10).
Next Level
The next advanced level exercises will be published in an upcoming guide. After mastering Level 5, contact us for the next series.
Good luck and stay healthy,
Carson Robertson DC
Nina Russin ACSM CPT, CIFT
For more information on golfing injuries or for call for an appointment (480) 812-1800.
Alpha Chiropractic & Physical Therapy
4955 S Alma School Rd#10
Chandler AZ 85248
www.robertsonfamilychiro.com