
Chiropractor Chandler AZ
What Causes Upper Extremity Injuries?
Upper extremity injuries can result from a traumatic event, such as a fall, or they can develop due to chronic overuse. Chronic overuse injuries are not necessarily sports-related. They can result from your work environment as well.
If you use a computer at work, your poor workstation ergonomics can lead to a neck or shoulder injury. Here’s a quick check:
Take a look at yourself in the mirror. First, look at where your head is positioned relative to the shoulders. You will need to do this from the side; if that’s uncomfortable, ask your significant other or a friend to help.
If your posture is good, your ears will form a vertical line down to the middle of the shoulder. If your head is in front of the shoulders, your neck is in a constant state of forward flexion, which can, over time, lead to neck pain.
Now, turn so you are directly facing the mirror and look at your hands. If your posture is correct, your thumbs will be pointed forward. If you can see the backs of your hands in the mirror, your shoulders are inwardly rotated. Once again, this can be the underlying cause of an injury.
People who do a lot of lifting, whether or not this involves heavy objects, also tend to be inwardly rotated. The upper trapezius muscles which are positioned on top of your shoulders and down the upper part of your back, get tight and over time, they shorten. At the same time, the middle and lower trapezius muscles become elongated and weak.
The upper trapezius muscles will initially gain strength in this shortened position, but over time, they will become weaker because the muscles lose sarcomeres or muscle segments. The elongated middle and lower trapezius muscles are also weak. In both cases, the ideal length-tension relationship between the muscles has been modified, so that these very important back muscles can no longer function optimally.
When the shoulders become inwardly rotated, the shoulder blades or scapulae tend to rotate upwards and move out towards the sides of your body. The scapulae and muscles that hold them in place such as the rhomboids, also stabilize the shoulder joint.
The joint in which the humerus (upper arm bone) inserts into the shoulder (glenoid fossa), also known as the glenohumeral joint, is inherently unstable. It is a ball-in-socket joint, but in this case, the ball (end of the humerus) is much larger than the socket. If the scapulae and related muscles aren’t able to help control that joint’s movements, the result can be injuries to the four rotator cuff muscles around it.
Other muscles in the area will also have to compensate for this instability: the deltoids and biceps in particular.
Good Posture Matters
Good posture isn’t something a person is born with. It’s something you have to learn. I agree. Following are a couple of exercises to get you moving in the right direction:
Y-T-W-L
A great stretch for the chest, shoulders, and upper back. Similar to performing the motions to the song YMCA, instead you will be performing YTWL. Repeat 3 times.
Y - Make a big Y with your arms with the elbows straight, and then pull the arms backwards until you feel a comfortable stretch. Hold for 10 seconds.
T - Lower your arms and form a T, once again pulling the arms backwards for a comfortable 10 second stretch.
W - Lower your arms and form a T, once again pulling the arms backwards for a comfortable 10 second stretch.
L - From the W position, lower your hands until a 90 degree bend occurs at the elbow. The elbow should be touching the torso. Stretch the hands backwards for 10 seconds.
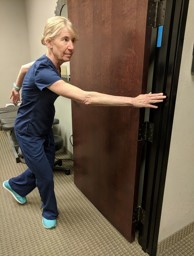
Door Stretch
Use an open door frame to stretch the chest. For the exercise think of your arms as hands on a clock. Different clock positions will stretch different parts of your shoulder and chest.
Use an open door frame to stretch the chest. For the exercise think of your arms as hands on a clock. Different clock positions will stretch different parts of your shoulder and chest.
Pack the Scapulae
Have your spouse or a friend put his or her hands on your shoulder blades. This kinesthetic reference will help you to feel the shoulder blades as you move them. Now pull your shoulder blades towards the center of your back. If they are in the correct position, they will be aligned with each other and about 2-4 inches apart.


Chin Tuck
Stand up straight with your arms and shoulders relaxed at your sides. Tuck your head and neck back (as if you are trying to make a double chin) until your head is in line with your shoulders (your ears should form a vertical line straight down to the shoulders). Move your head back and forth into this position. It will feel awkward at first, but as your posture improves it should be more comfortable.


Lower Back to the Wall
Stand against a wall with your head, back and hips flat against the wall. Your feet should be about three inches away from the wall. There will be a space between the wall and your lower back. The goal of this exercise is to use your lower abdominal muscles to push the lower back into the wall. The best way to do this exercise is to push the lower back into the wall, hold it for a couple of seconds, rest and repeat.


Two-Arm Cable Row
Tie a cable to a railing or doorknob. Hold one end of the cable in each hand. The cable should not have any slack in it, but it doesn’t need to be stretched out.
Pull the ends of the cable down towards your hips, folding your shoulder blades at the same time. Be careful not to let those upper trapezius muscles take over (you will notice your shoulders going up if this happens). The purpose of this exercise is to strengthen the middle and lower back muscles, so they can better control the movements around the shoulder joints.


Other Shoulder and Back Exercises
Now that you’ve mastered the basics, it’s time to move on to some more challenging stuff. You might have noticed by now that the exercises we are suggesting are different than what you might be doing at the gym. Our approach to exercise is functional: we are not concerned with muscle hypertrophy (exercises to make your muscles bigger and more refined). Our purpose here is to make all of the muscles and joints work together properly, to avoid injury and chronic pain.
Because of our functional focus, we try to involve the whole body as much as possible. Why? What affects your upper back and shoulders also impacts the lower back and vice versa. It’s all connected.You have probably seen us working on exercise balls in the office. We like using them because they force you to use your pelvic stabilizers: something that is very important to maintain good posture and reduce the risk of injury.
If you are a golfer, you need to use these muscles to stabilize your core when you hit the ball. This first exercise will help.
Seated Twist and Woodchopper
Sit on the exercise ball and grab either a light dumbbell or kettlebell. If you are using the kettlebell, hold it by the handle. This allows for some weight shift during the exercise, to make it more challenging.
Start by twisting to the right side and the left, holding the weight at chest height. This might seem more challenging than it looks, since you have to stabilize your lower body to stay on the ball.
Once you have mastered that movement, use the same weight while doing woodchopper movements: upper right to lower left, and upper left to lower right. This vertical twisting movement is similar to some of what your body does when you swing a golf club.
Move Your Weight Training from the Bench to a Ball: Exercises for the Shoulders and Arms
Any weight training exercise you currently do on a bench can be done on a ball with a few modifications. The ball works the entire body, especially the core muscles around your abdomen and lower back.
Here are a couple of examples you get you started.


Bicep Curls on the Ball
Grab a dumbbell in each hand while seated on the ball. Start with the arms extended out and down. For a standard bicep curl, the hands are under the weights, and the palms are facing forward. A more challenging exercise is a reverse curl, gripping the dumbbells overhand. Slowly curl the arms up by bending at the elbows, moving the weights up towards your shoulders. Lower the arms back down and repeat a total of ten times for a set.


Standing Bicep Curl: 21s
For a more challenging version of the bicep curl, begin by grabbing either a set of dumbbells or a barbell in both hands. You will be doing twice as many reps to complete a set, so start with weights a little lighter than a traditional bicep curl.
Begin with the arms extended downward. Curl a third of the way up, then extend the arms back down to the starting position for the first seven reps. Then begin one third of the way up, and curl up to the two-thirds position for the second seven reps. The final seven reps start at the two thirds position and finish at the top of the curling position.
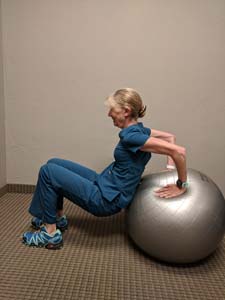
Tricep Dip on the Ball
Start out seated on the ball with your hands by your sides, palms on the ball facing forwards. Your feet should be shoulder width apart and out in front of you with the knees slightly bent. Lift your hips up off the ball and dip them in front of the ball. You will need to use both your core muscles and your triceps to stabilize yourself. Dip a total of ten times for a set, then return to the seated position.

Military Press on the Ball
Use dumbbells for this version of the military press. Start out seated on the ball, with your elbows bent and and the weights at shoulder height. Slowly straighten your arms until you have pressed the weights towards the ceiling and your arms are straight above your head. Be careful not to arch your back. Return to the starting position and repeat ten times for a set.


Tricep Extension on the Ball
Do this exercise seated on an exercise ball. Grab a dumbbell in one hand, bend your elbow and raise it up towards your ear. The weight should be behind your head and facing downward. Straighten your arm and raise the dumbbell above your head. Repeat ten times on each side for a set.


Move up to the BOSU
Doing any standing exercise on a BOSU ball makes it more challenging and once again, involves the core muscles. Once you have mastered the seated twist with weights described above, try doing the same exercise while standing on a BOSU ball. You can also do lat side and front raises, and the military press on the BOSU.
Rows and Flies on a Mat or Bench
You can do rows or flies on a yoga mat, a weight bench or while standing.
One Arm Row
Do this exercise from a quadruped position on a yoga mat, with one foot on the ground and one knee bent on a weight bench, or for a greater challenge, starting in the plank position. When doing rows, be sure to keep your elbow close to the body. Grab a dumbbell and begin the exercise with your arm fully extended. It can be straight down if you are on a bench. If you are starting in a quadruped position, you may need to extend the arm slightly forward. Starting from the plank position the arm will be extended down with the weight on the ground.
Slowly bring the weight up towards your waist keeping the elbow bent and close to the torso. Then lower the weight down to the starting position and repeat ten times for a set. Repeat a set of ten using the opposite arm.


Two Arm Row
Do this exercise from a standing position, hinged forward at the waist. Hold a dumbbell in each hand, beginning with both arms fully extended down. Slowly bend the elbows and move the weights up towards the torso using a rowing motion. Lower the weights down as you extend your arms. Repeat for a total of ten reps for a set.


Kickbacks
Kickbacks are an exercise to strengthen the triceps. Start by grabbing a dumbbell in each hand. Hinge forward at the waist. Bend your elbows and keep your arms close to the torso. In the starting position, the weights will be close to your shoulders and your elbows fully bent. Keeping the weights close to the torso, extend your arms so the weights arc backwards. When your arms are fully extended, the dumbbells should be close to your hips. Return to the starting position and repeat ten times for a set.


FlexBar Exercises
The TheraBand FlexBar is a great tool for developing arm strength and coordination. Rubber FlexBars come in different widths and stiffness, so you can use them to rehab an injury or to enhance your strength in a key area.
FlexBar Shake
Do this exercise while sitting on an exercise ball or standing. Hold one end of the FlexBar and extend your arm out to the side or out in front. Then shake the bar. This exercise will enhance your grip, upper arm and shoulder strength. To make things more challenging, do woodchopper movements while shaking the Flexbar. Twisting at the waist to the right or left while shaking the FlexBar challenges the core.

FlexBar Bend
Hold one end of the FlexBar in each hand. Bend the FLexBar into a U-shape, then reverse it and bend the other way.

FlexBar Twist
Hold the end of the FlexBar in each hand, twist the bar in one direction and then back in the other direction.

Wrist Flexion with Dumbbells
Do these exercises seated on an exercise ball or standing, starting with one hand at a time or using both hands. Palms facing should be facing upward. Grip a dumbbell in each hand and extend the arms fully, flexing the wrists so that the dumbbells move toward your elbows. Repeat ten times for a set.


Wrist Extension with Dumbbells
This exercise works the extensor muscles. Once again, these can be done seated or standing with one or two hands. Begin with the arms in a supinated position (palms down). Extend the wrists backwards, moving the weights towards your elbows. Return to the starting position and repeat ten times for a set.


Wrist Twist with Dumbbells
Do this exercise with one or two hands, seated or standing. Gripping the dumbbells with arms extended, twist the dumbbells in one direction ten times, then reverse directions.
Helpful tip: If you are rehabbing an injury, support your arms on armrests to make this exercise less challenging. Then progress to the arms unsupported.


Radial Deviation with Dumbbell
Grip a dumbbell in one hand and rest your forearm on a table. With your palm facing toward the side, bend the wrist up and down. Repeat each side ten times for a set. As you get stronger, try doing this exercise without resting your arm on the table.
Finger Web Grip
A Finger Web is a tool used to strengthen the fingers and hands, and to build dexterity following illness or injury. You can use the Finger Web to enhance your grip strength, work on controlling finger movements, etc.


Towel Grip
This exercise accomplishes similar gains to the Finger Web grip using something that everyone has at home. Simply place a rolled up towel in your hand and squeeze. Repeat ten times on each side for a set.

Home TheraBand Exercises
TheraBands are elastic bands that are color coded to represent different tensions. They are inexpensive, portable, and a great way to continue your physical therapy at home. Following are a few ideas:
Rows
Tie a length of TheraBand around a rail or doorknob. Hold one end of the band in each hand and draw your hands back in a rowing motion as you bend your elbows. Keep the elbows close to the body and don’t let your shoulders rise up (those upper traps trying to take over).
Scapular Retraction:
Keeping your arms straight and shoulders low, pull the ends of the band straight back as your squeeze the shoulder blades together.


Adduction
Adduction is motion of the arms or legs inward towards the body (abduction is just the opposite- moving away from the body). Holding the end of the TheraBand in one hand, pull the band inwards towards your side. Keep the elbow straight and shoulders down.
External Rotation
Hold one end of the TheraBand in your hand. Your elbow should be bent, and your hand will be at your body’s midsection. Keeping the elbow bent, rotate the band outward. Bring it back to the starting position and repeat ten times for a set.
Internal Rotation
This is the opposite of the external rotation exercise. Start with the hand rotated away from the body and rotate it inward towards your midline.
Bilateral External Rotation
Hold one end of the TheraBand in each hand, keeping your elbows bent and upper arms next to your body. Your hands should be at your body’s midline. Rotate each end of the band outward, then return to the starting position. Repeat ten times for a set.
Wrist Stretches
When stretching out an injured area, don’t force the stretch. You want to feel the stretch but it should not be painful.
Extensor Stretch
Use your uninjured hand to bend the wrist of your injured hand down. Hold for 15 seconds and repeat one time.
Flexor Stretch
This time, bend the injured wrist up and hold for 15 seconds. Repeat one time.
Prayer Stretch
Press the palms of your hands together to stretch out the wrists. Hold for fifteen seconds, rest and repeat.